How to Do a Discord-based Talksprite PNGTuber Thing
Works 4 guests too!!
Step 1: Upload your talkprite pngs to Discord.
- You will need 2 separate images: One for mouth open (talking) and one for mouth closed (not talking).
(They can be pngs or gifs or jpegs or whatever if u want)
- Just put them in any channel.
(I'd recommend creating a private channeljust for them so they don't get buried in chat.)
- Right click and Copy Link for each image.
- Hold onto these you will need them later- paste them in a text doc or something.
Also make sure you remember which one is mouth open and which one is mouth closed.

Step 2: Get your Discord ID.
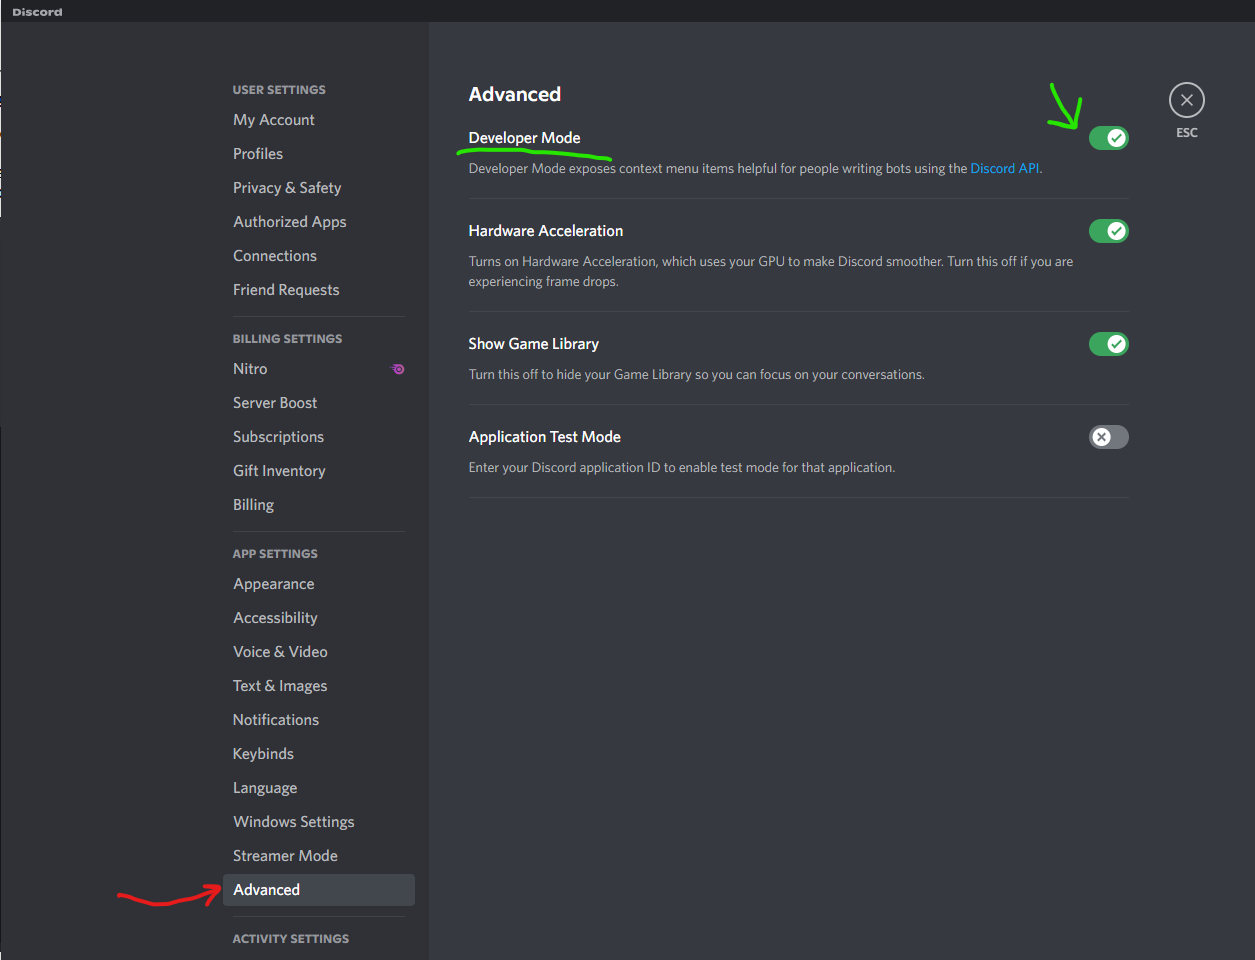
- Go into your Discord Settings > Advanced > Turn on Developer Mode.
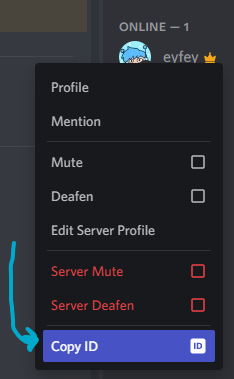
- Once that's on, go to the user list for your server, right click the user you are setting up a talksprite for, and click Copy ID
- Hold on to this ID you will need it in a second.
Step 3: Adjust the Code.
- Now it is time to use the things you are holding. Edit the code below.
- Replace DiscordIDGoesHere with the Discord ID you copied.
(leave the quotation marks they're part of the code)
- Replace NotTalkingSpriteGoesHere.png with the url for your Not-talking sprite (mouth closed).
- Replace TalkingSpriteGoesHere.png with the url for your Talking sprite (mouth open).
- Now forget about the things you were holding before and hold on to this edited code instead.
/* Change URL if not working- https://streamkit.discord.com/overlay */

li.voice-state:not([data-reactid*="DiscordIDGoesHere"]) { display:none; }
.avatar {


/*NOT TALKING SPRITE*/

content:url(


NotTalkingSpriteGoesHere.png

);


  height:auto !important;
  width:auto !important;
  border-radius:0% !important;
  filter: brightness(100%);


}

.speaking {
  border-color:rgba(0,0,0,0) !important;
  position:relative;
  animation-name: speak-now;
  animation-duration: 1s;
  animation-fill-mode:forwards;
  filter: brightness(100%);


/*TALKING SPRITE*/

content:url(

TalkingSpriteGoesHere.png

);


}

@keyframes speak-now {
  0% { bottom:0px;  }
  15% { bottom:4px;  }
  30% { bottom:0px;  }
}

li.voice-state{ position: static; }
div.user{ position: absolute; left:-40%; bottom:-10%; }

body { background-color: rgba(0, 0, 0, 0); margin: 0px auto; overflow: hidden; }
There are a few other things you can adjust if you want:
- Change the brightness% underneath the not talking sprite url if you want the image to "dim" when you're not talking.
- Change the 4px after 15% at the bottom to 0px to remove the bounce when you talk (or increase the number to make the bounce bouncier)
Step 4: Set up Streamkit
- Go to the Streamkit site and click install for OBS.
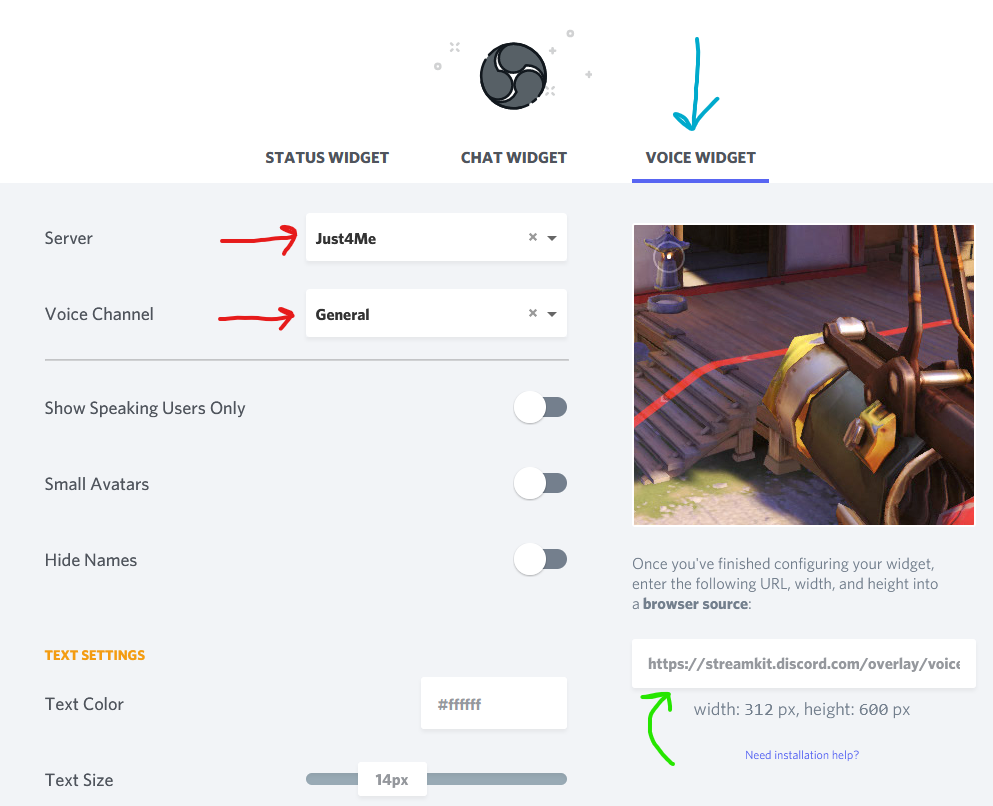
- Go to Voice Wiget
- Set your Server and Voice Channel.
- Copy the Widget URL and hold on to it!!
Step 5: Create your Browser Source
- Now it is time to use the Code and Widget URL that you are holding.
(Did u remember to hold them??????)
- Create a new browser source in OBS.
- Set the URL to your StreamerKit Widget URL.
- Set the Height and Width to the dimensions of your talksprite image.
- Delete anything in the CSS box and paste your edited code in here.

And that's it!
Everything should work now!
If you want to add multiple talksprites for multiple users, just create an individual browser source (step 5) and repeat steps 1-3 for each user/talksprite.
- You should be using the same StreamerKit URL on every Browser Source
- You'll pretty much only need to change the Discord ID and the talksprite URLs
(and the height/width if the talksprites are sized differently)